Solar Water Heater
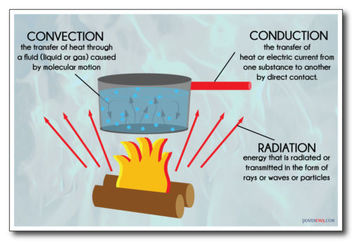
To prepare for the creation of our tiny house, three experiments were conducted. The first was building a functioning water heater out of classroom items. Once the water heaters were built, they were set outside in the sun to test their functionality. To test this, we put water into our heater and let it sit out in the direct sunlight for approximately an hour. The temperature of a fixed amount of water was taken before the experiment, then taken after. The larger the difference in temperature, the more your water heated up. The purpose of this mini lab was to help grasp the concept of heat transfer. Radiation, convection, and conduction, were covered. Each one of these concepts were demonstrated in the lab. Radiation is the transfer of heat using rays or waves. In this case, the sun uses radiation through it’s sun rays to heat up the copper piping. The copper piping then heated up through conduction. Conduction is heat transfer through a material. Finally, convection is put to use as the water heats up. Convection is heat transfer through a fluid. This creates heat to rise the temperature of the water. There were a few main takeaways from this project after reviewing the data. One was that black absorbs heat extremely well. Painting the copper pipe black drastically increased the absorption of the pipe. Another was reflective surfaces and direct sunlight were key. Two sum these two points up, the more sunlight the better.
Daylighting Model
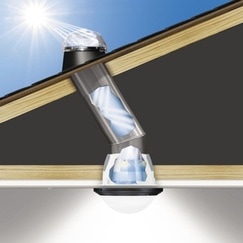
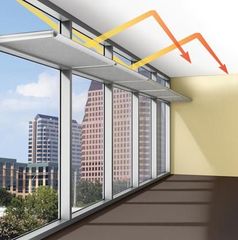
The second thing we did was creating a daylighting model. Each group created a mini house that utilized many daylighting techniques. To do this, we built a house on a one inch is equivalent to one foot scale. Once the house was built, the various daylighting techniques were put to the test. We tested by using a lamp to mimic the sunlight at various point of the day in various seasons. The different daylighting techniques we incorporated were solar tubes, light shelves, clerestory windows, and skylights. Solar Tubes are tubes lined with a reflexive surface to maintain the sun's rays. The tubes extend from the surface of your roof to the surface of your ceiling, where it lets out dispersed light. Light Shelves are shelves, usually horizontal, extending from the base of windows with a surfaces made of reflexive material. These take the sun’s rays and reflect them onto the roof of the home. Ideally, the roof of the home is a light color to reflect the light coming from the light shelves better. Clerestory windows are windows strategically placed to take in direct sunlight. These special widows are placed above regular eye level. They are often placed in such a way that the sunlight ends up hitting a wall which displaces the light around the roof. The final daylighting technique is skylights. Skylights are windows in the roof of the house that let the light from the sun shine directly through them. These are commonly used in attics of houses. Our solar house included all of these daylighting techniques. Placement of ordinary windows also played a big role in the effectiveness of daylighting. We found that north and south facing windows receive the best lighting depending on the season. In addition to window placement, we found that skylights were more effective than solar tubes. Skylights are usually bigger, which allowed more light in than the solar tubes did. In conclusion, we found that the keys to good daylighting were having north or south facing windows, and large skylights.
Solar Tube
Light Shelf
Clerestory Window
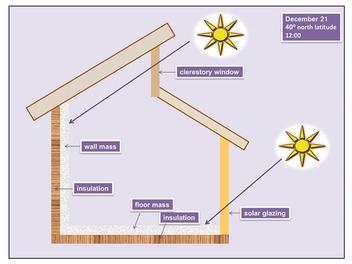
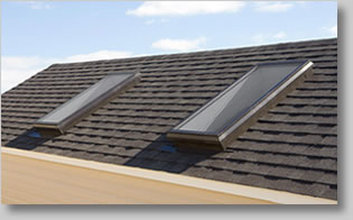
Skylight
Materials Heat Lab
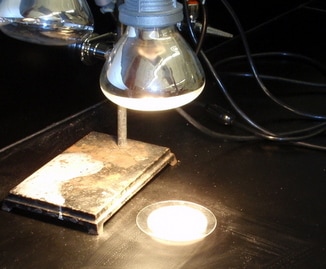
Our third experiment we worked on was a materials heat lab. For this experiment, we tested out numerous materials to see how quickly they absorbed heat. To carry this out, we set up heat lamps a fixed distance above the counter tops. Then, we placed the material on the counter and turned on the heat lamps for ten minutes. We took the temperature of the material prior to any heat exposure, after 5 minutes of heat, and after ten. These measurements told us information such as the rate in which the material heats up. This information then tells us which materials would be good for different purposes. We found that a brick outer layer is good for keeping heat out, due to the material’s poor hat absorption. We also found that tile is good for cold places because it will heat up quickly after a cold night. One flaw of this lab was that we neglected to account for cooling rate. This would have given us an idea of how the materials act at night versus in the day. To improve, we should still take the heat away at 10 minutes, but take temperatures at 15 and 20 minutes.
Tiny House
For this project, we created a tiny house. These houses are designed to fill a certain need for a family or group of people. Each group created an individual and unique home to fill a different need. Ours was designed as a 2 to 4 person surf getaway on a California beach. These houses have every necessity of a full sized house, while compressing to reduce the overall cost of living. Tiny houses are designed to utilize space in the most efficient way possible while maintaining a space big enough for living. Ours is 160 square feet; 8 feet wide, and 20 feet long. It is also 16 feet tall. The first floor is 8 feet tall and the loft is 6. This loft element adds to the open concept aspect of our house. There are many key features to the home as well. There are several large windows for ocean views, as well as an ocean view deck outside the door. For the surfers, we have a 12 foot surfboard rack in the back and an outdoor shower to avoid tracking sand inside of the house. The foundation is solid, with the corrugated roofing and walls made out of sturdy plywood and stucco. Concrete blocks and mesh wiring to keep out rodents also helps to maintain a strong foundation. With the foundation, roofing, walls, deck, and interior elements all included, our tiny house comes out to be just over 17,000$.
This project, I feel, was a strong one for me. I don’t think the collaboration rubric or self evaluation score did my work ethic throughout the project justice. I think this was the project that I have been most motivated to work on, and contribute to the group. Not only did I draw up every blueprint, but I also thought them up. I also came up with and made decisions for many big picture ideas such as overall design as well as little picture decisions such as washing maching choice or specific item placement details. In this project however, I could have taken the leadership role on a little more. I feel that I was spending too much time doing what was asked of me while I should have spent more time checking in with everyone and offering help from a leadership standpoint. This project was the most challenging, open ended, and hands on yet. I am anxious to see what follows in the final few months of my year as a freshman in the stem program.
This project, I feel, was a strong one for me. I don’t think the collaboration rubric or self evaluation score did my work ethic throughout the project justice. I think this was the project that I have been most motivated to work on, and contribute to the group. Not only did I draw up every blueprint, but I also thought them up. I also came up with and made decisions for many big picture ideas such as overall design as well as little picture decisions such as washing maching choice or specific item placement details. In this project however, I could have taken the leadership role on a little more. I feel that I was spending too much time doing what was asked of me while I should have spent more time checking in with everyone and offering help from a leadership standpoint. This project was the most challenging, open ended, and hands on yet. I am anxious to see what follows in the final few months of my year as a freshman in the stem program.
Materials List
